
Week #2 - Angles
This week we are still going to focus on window light; however, we are going to add "angles" to the assignment. Try and do something similar to what you did before; however, this time move around your subject. You should take AT LEAST ten pictures. Take a picture while on your tummy, get on a chair and have your subject look up at you, and then move all around your subject. Don't forget that you should not be looking down or up at them at all during this. Okay...well, except for the chair and tummy shots I just mentioned. Your lens should be at the same level as their eyes. Take a picture at every angle you can think of. Then post your favorite three.
Okay, I decided to post some pictures so you know what I am talking about.
Most people who take pictures just stand up right where they are and take a picture. I should have taken a picture of what that looks like, but I didn't. Anyway, they don't get down on the level of the child. Also, they take one picture, and then they are done. Most "professional" photographers take tons of pictures. They also check out all the possibilities. It is a good practice to look at the different angles available to you. Don't simply take a few pictures of the same pose at the same angle and then sit down. Do a walk around. Here are some examples.
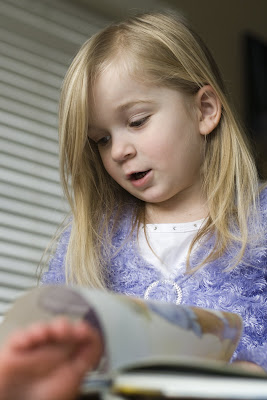
 This is your typical angle. Straight on. Cammie is facing the window. We usually want our child to look up at us and smile. When I look at this picture, it makes me feel like someone is in room. Does that make any sense? It makes me feel like she is looking at me, and not paying attention to the book. Oh, and also notice that because I have her directly facing the window, there are not a lot of soft shadows. Great lighiting don't get me wrong but not as "artistic" as it could be.
 I did not edit this picture. It is a little dark. Anyway, this picture is still taken straight on, but I moved the coffee table she was sitting on so that the window was to her right. The difference in lighting creates a different feel. Notice that she is not looking at me either. I am letting her read the book. To me, this picture feels like no one is in the room but her. I don't feel like anyone else is involved....kind of like I am photographing a private moment. I am just bringing this to everyone's attention because we sometimes forget to take these types of pictures.
 Cammie is facing the window again, but this time I moved. I am taking a side view of her. Notice the difference in the lighting.
 I changed my angle a little bit again. I am not exactly at eye level because I wanted to get more of the book in the picture.
 I am standing right above her. She looks sad in the picture, but usually, I kind of like this angle. I edited this picture. It was the first one I did. Then I decided that I wasn't going to edit any more pictures. It would take too long. I would go back and get the color version, but I am too lazy. :)
 Last is the angle where I was looking up at her (tummy shot). I usually don't like this angle at all. It is a general rule in photography to never look up at a person...unless they are super skinny or something like that...don't remember. Anyways, try not to take pictures looking up at people.
Okay, I decided to post some pictures so you know what I am talking about.
Most people who take pictures just stand up right where they are and take a picture. I should have taken a picture of what that looks like, but I didn't. Anyway, they don't get down on the level of the child. Also, they take one picture, and then they are done. Most "professional" photographers take tons of pictures. They also check out all the possibilities. It is a good practice to look at the different angles available to you. Don't simply take a few pictures of the same pose at the same angle and then sit down. Do a walk around. Here are some examples.
 This is your typical angle. Straight on. Cammie is facing the window. We usually want our child to look up at us and smile. When I look at this picture, it makes me feel like someone is in room. Does that make any sense? It makes me feel like she is looking at me, and not paying attention to the book. Oh, and also notice that because I have her directly facing the window, there are not a lot of soft shadows. Great lighiting don't get me wrong but not as "artistic" as it could be.
 I did not edit this picture. It is a little dark. Anyway, this picture is still taken straight on, but I moved the coffee table she was sitting on so that the window was to her right. The difference in lighting creates a different feel. Notice that she is not looking at me either. I am letting her read the book. To me, this picture feels like no one is in the room but her. I don't feel like anyone else is involved....kind of like I am photographing a private moment. I am just bringing this to everyone's attention because we sometimes forget to take these types of pictures.
 Cammie is facing the window again, but this time I moved. I am taking a side view of her. Notice the difference in the lighting.
 I changed my angle a little bit again. I am not exactly at eye level because I wanted to get more of the book in the picture.
 I am standing right above her. She looks sad in the picture, but usually, I kind of like this angle. I edited this picture. It was the first one I did. Then I decided that I wasn't going to edit any more pictures. It would take too long. I would go back and get the color version, but I am too lazy. :)
 Last is the angle where I was looking up at her (tummy shot). I usually don't like this angle at all. It is a general rule in photography to never look up at a person...unless they are super skinny or something like that...don't remember. Anyways, try not to take pictures looking up at people.
posted by Erin | 2:47 PM
|
0 comments
![]()


